Expanding your Picking:
Bluegrass Rhythm and Travis Picking
99% of all guitarists begin their learning in the same way... We learn a half dozen or so open chords, grab a songbook (or an online chord sheet, depending on how old you are) and start banging away, playing full chord rhythms over our favorite songs [Editor’s Note: The author’s description of the beginning guitarist’s learning process overlooks the brief sojourns many of us took with Smoke on the Water and Sunshine of Your Love. This is intentional. The less spoken on this subject, the better]. This style of play can be fun, but most players are eventually going to want to branch out and start incorporating new techniques into our playing, something to add variation and color into our repertoire. In this article we'll be looking at two different styles of play that can take a player from simply strumming chords to truly making music; Bluegrass Rhythm Playing and Travis Picking.
Before we begin, lets talk about what you’re going to need to work this way through the article. The first, and easiest will be a flat pick. If you don’t have one in your guitar case or on your desk, you will find your in either your pants pocket or sitting in the bottom of your dryer. For these exercises I recommend a medium to heavy gauge pick if you have any on hand. You'll want something with a bit of give but generally rigid. The other pick you may want to have is a thumb pick, but this is optional (More on this later). Third, and most importantly, you’re going to want a metronome. While some pendulum style mechanical metronomes can cost hundreds of dollars, a simpler digital model can generally be purchased at a fraction of this price at nearly any guitar store (May I recommend Maury’s Music?). If you don’t have one already, I really suggest picking one up and starting to use it in your every day practice. Getting solid timing down as soon as possible will only help in the future, especially when playing in groups. Now on to the show...
Bluegrass Rhythm
The Acoustic Guitar has become an integral part of Bluegrass and Country music over the last century and it's hard to imagine either style of music played without at least one on stage. The best way to think of an acoustic guitar in a Bluegrass group is less as a melody instrument and more as a drum with strings. Truly great bluegrass guitarists understand their role as a member of the rhythm section who, along with the bass player, keep the rest of the more exploratory instruments reined in. And, while it’s true that the guitarist will normally trade leads along with the rest of the group, 90% of their time is spent making sure that the beautifully controlled chaos that is Bluegrass music doesn't devolve into simply chaos. If you haven’t yet had the pleasure of being on stage when a band falls apart, believe me when I say that as valuable of a learning experience as it may be, you’re going to want to keep these instances to an absolute minimum.
The point of all this is to stress the importance of timing in these exercises. Some of them, especially the early ones, may seem so simple that you’re tempted to skim over them quickly. For your own sake, I’d recommend that you do not. Go over each exercise slowly and repeatedly, paying careful attention to make sure your notes all fall directly on the beat and also that their volume doesn’t fluctuate. We want an even volume across all of these exercises, leaving dynamics alone until after we have the basics down.
Some notes on notation:
All of the examples in this article have been written in tablature forum instead of standard notation in order be of use to the greatest amount of people. However, there are certain elements of standard notation used in this article to illustrate certain points. First, let’s talk about stroke notation.
 - This symbol is used to illustrate a downstroke with your pick. A downstroke is simply when your your arm is moving from the low E string towards the high E string.
 - The symbol for an upstroke which is the exact opposite of the downstroke. Your pick will strike the string or strings as your arm moves from the low E string towards the high E.
Generally, and for the purposes of this article, downstrokes will happen on the beat and upstrokes will happen between the beat. Which brings us to...
Quarter and eighth notes
Take a look at the example below (Exercise 1). We have two bars of the open E string note, all written as quarter notes (Designated by the single line radiating from the number). A quarter note is a note that lasts for exactly one beat. As you listen to a song in 4/4 time, count along… “One, Two, Three, Four. One, Two…). Each time you say a number should is one beat.
Set your metronome to something like 60 beats per minute and play through this exercise for a few times. Each time you strike the E string should land directly on the click of your metronome. Listen carefully and practice getting this timing as solid as possible.
(Exercise 1)

Eight notes
Eight notes are notes that take up exactly half of one beat .They can happen either directly on the beat or halfway in between. The proper way to count eight notes is as “One and Two and Three and Four and…”. Each word said is an eight note in length. The numbers are landing directly on the beat and the “ands” fall exactly halfway in between them.
Exercise 2 is similar to exercise 1 but, instead of the open E notes being written as quarter notes, they’re all written as eights. Note the “flags” that stick out from the end of the radiation quarter note lines. These single flags signify that the note is an Eight note. Play through this exercise with the same slow tempo as Exercise 1. Really focus on having the length of each note be uniform. Counting out loud with yourself as you play will often make this much easier.
(Exercise 2)

Full Chord Rhythm
Now that we have the basics of notation out of the way, it’s time to take a look at full chord rhythm playing. This exercise will consist of chord changes and strumming rhythm changes. Keep a careful eye on each bar as the strumming pattern will change throughout the exercise. Also, be sure to take notice of the upstrokes and downstrokes, using Downstrokes on strums that fall on the beat and upstrokes on strums that fall between two beats.
(Exercise 3)
Alternating Bassline
Alternating bass are commonly found in Country and Bluegrass music and are a great way to add some variety into your rhythm playing. What happens is that on the 1st and 3rd beat of a measure the player will pick a single note with their pick on the E A or D string and will strum the full chord on the 2nd and 4th beats. The reason they are called “Alternating” bass lines” is because no one string will be struck twice in a row. For example, if when playing a G chord we strike the low E string on the 1st beat we will not strike it again on the 3rd beat, instead choosing the A or D string. For this exercises, pay close attention to what bass notes are being struck on the 1st and 3rd beats as they will change as the progression does. Also, Bar number 6 has no strum notation marks. By following the rules already given you should have no trouble figuring out what are upstrokes and what are downstrokes.
(Exercise 5)
Walking Basslines
Generally when one thinks of walking basslines they think of upright bass player, but that doesn’t mean guitarists can’t get in on the action. Walking basslines are simply single notes that are played as a way to move from the root note of one chord to another. They add an interesting sense of rhythm to our playing and can take what would normally be a pretty boring chord progression and instill some color into it.
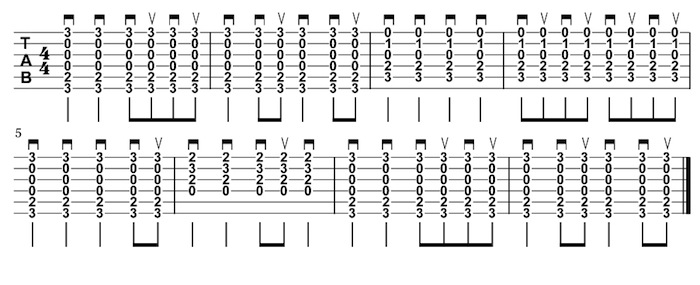
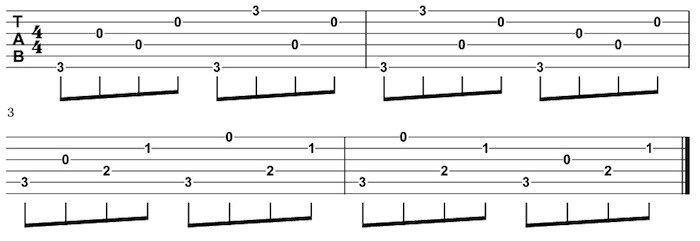
Exercise 6 will incorporate all of the different elements we’ve discussed for Bluegrass rhythm so far. You’ll find variations on alternating basslines, strumming rhythm and walking basslines throughout the entire piece. As I’ve stressed before, start slow, pay attention to the rhythms and the stroke notation and play through the entire piece as many times as is necessary until you don’t have to think about it. Like most skills on a guitar, repetition is key. You need to go past the the point of “I can play this if I think about it” and move on to not even needing to think and letting it just come naturally through you. This is as close to a Zen philosophy as I'll probably ever get.
(Exercise 6)
Travis Picking
Travis picking is a genre of fingerstyle where the thumb provides a steady alternating bass line while the fingers play the melody notes. Traditionally, Travis Picking is performed with 3 fingers, the Index, Middle and Ring, with covering the notes on a particular string (G, B and e respectively). The pinkly is often used as an anchor for the rest of the hand, with some players resting on the pickguard. This traditional 3 finger style is, of course, subjective and may not work for every player. Personally I use my Thumb, Index and Middle fingers when Travis Picking as I suffered an injury years ago to my Ring finger that makes it difficult to play with. Another famous example of going against the norm is the Reverend Gary Davis, who was well known for playing extremely intricate fingerpicking patterns using only his thumb and index finger.
As you become familiar with Travis picking you will undoubtedly find which style works best for you but, if you’re just starting out, I recommend using the 3 finger approach if possible. Later you may find you only want to use two, which is an easy transition to make. However, going from 2 fingers to 3 is a much harder transition. When looking at the following exercises, keep this in mind. All notes on the G string will be played with the Index finger, the B string by the Middle and the high E string by the ring finger. Any notes falling on the Low E, A or D strings will be handled by the thumb.
Just the bass
Exercise 8 consists of a simple alternating bass pattern across a G chord and a C chord. Like Exercise 1, do not be tempted to skim over this exercise. The key to good Travis Picking is a steady thumb. The bouncing back and forth between bass notes needs to be drilled into your muscle memory. With a metronome, play through this exercises completely, paying special attention to your timing and dynamics. Each note should fall exactly on the beat and each should be of a uniform volume. For those of you who haven’t done this before, it’s going to feel awkard, but the only real way to get through it is sheer repetition. Personally, when I was learning to travis pick I would sit with my guitar in front of the television and, while watching a movie or something, mute the strings with my left hand and practice bouncing back and forth between strings with the thumb of my right hand.
(Exercise 7)

Pinching
In Travis Picking, playing two notes at the same time, one with your thumb and one a finger, is known as a pinch. Just like the alternating bass line, pinches will fall right on the beat.
(Exercise 8)

Syncopation
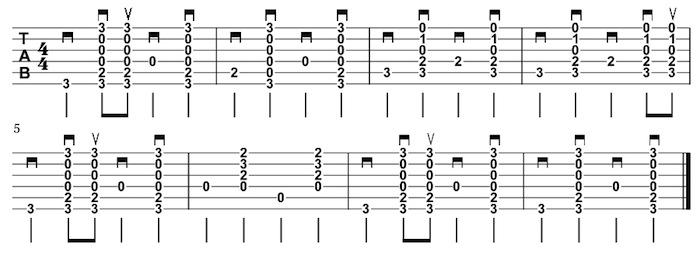
The simplest definition of syncopation is when notes fall between the beats instead of on them. In terms of travis picking it’s when you have melody notes played with one of your 3 fingers in between your on the beat bass notes played by your thumb. During this exercise, remember which fingers are designated to which strings and concentrate on using the correct ones.
(Exercise 9)
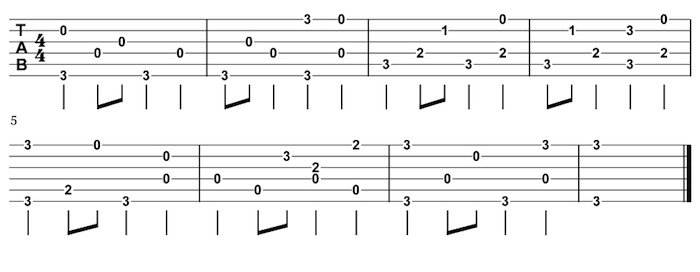
All Together Now
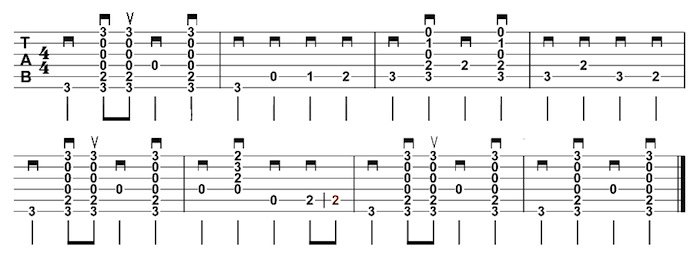
Our final travis picking exercise is to bring all 3 of the skills we've taken a look at (Alternating bass lines, Pinching and syncopation) and use them together for one piece. This example is going to be a little more complex than our others. Beyond mixing all of the different pieces of Travis Picking, we're also going to introduce some passing notes into our melody. This means that there are notes in certain measures that are not part of the chord and may require either lifting or moving a finger to play correctly. If you're just starting out travis picking this piece may be a little too difficult to get down right away, but it's not impossible. Keep working on the fundamental skills from the earlier Travis Picking examples and you'll be ready to tackle this in no time.
Epilogue: To pick or not to pick
As I mentioned at the beginning of this article, a thumb pick (Pictured Below) is an optional piece of equipment when Travis Picking. Thumb picks will give your alternating basslines a brighter, stronger attack than the bare skin of your thumb. However, sometimes the tone can be a little too abrasive or in your face, depending on what you're playing. Some players swear by them, some players never touch them and others, myself included, switch back and forth. Personally on faster, more upbeat songs I'll tend to use a thumbpick while I'll fall back on bare skin for slower, sadder songs.

Thumb Picks
Just keep in mind that, if you learn with or without a thumbpick, you'll need to retrain yourself when you switch to the other option. I personally learned Travis Picking by using a thumb pick, mostly because that's how I saw John Prine doing it. Months later when I decided I wanted to be able to use bare skin too I had to spend a week or so retraining the muscles in my hand to compensate for the fact that my thumb had to strike the string itself rather than be a quarter inch infront of it. For beginning players I recomend learning without a pick and introducing one later.
Some final notes on Bluegrass Rhythm and Travis Picking
- Start slow. I know I've said this a dozen times already in this article, but this point really can not be stressed enough. Although it may seem counterintuitive, starting slow will speed up your learning process. Begin with the metronome set to 60 beats per minute. After you have played through the piece a couple of times, move it up in 5 or 10 click increments until you find it's too fast. Once you've reached this point it may be a good idea drop the metronome well below your "top speed" and play the song again a few times. Fast tempos have the habit of helping to hide mistakes and only by dropping the tempo can you see where you're messing up. A rule of thumb to keep in your head is that if you can't play it clean at half speed, you probably can't at full speed.
- When Travis Picking, if you feel yourself start to slip, keep your attention focused on the alternating bass line rather than the melody. An audience is likely to overlook a few flubbed melody notes but if the pulse of the bass starts to fall apart the rest of the song will too.
- Experiment: When practicing either of the two styles, don't be afraid to try new things. Come up with new Travis picking patterns, run walking basslines form every pairing of chords you can think of. You're sure to hit a bunch of bad sounding notes in the process but you'll learn what sounds bad and why.
That's it for this week. I hope some you found this article interesting, either as new informatoin or as a refresher for something you were already familiar with. If you have any comments, questions, concerns or criticisms, please feel free to use our comment box below.